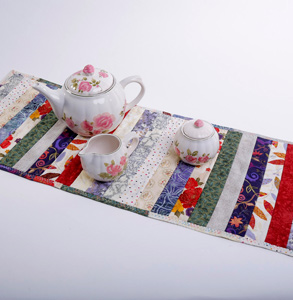
Stripy Table Runner
Fabric Requirements
- Batting, 13" x 36"
- 24 2" x 16" strips
Assembly
- Measure batting to 13” x 36”
Note: You can easily make this runner any size you wish. Simply cut your batting the size you would like your finished runner to be. - Cut Backing Fabric 13” x 36”, or the same size as your batting.
- Cut 24 strips (2” x 16”) or any size you like. The fun thing is they don’t even have to be the same width.
- For an even scrappier look sew strips of different prints together to create 24 strips (2” x 16”)
- Lay the backing fabric on your work surface with right side down.
Place batting on top of Backing. Smooth batting, you may wish to use a spray baste to secure backing and batting together.
With batting face up; Place first strip, right side up, at left end of batting.

Note: Consider that you will be sewing through 4 layers; I prefer to use my walking foot.
Place second strip, right side down, on top of the first strip.
Use a 1/4″ seam to stitch through all layers.

Flip Fabric open and Press Seam.

Place 3rd strip, right side down, on top of the 2nd strip.
Sew ¼ inch seam through all layers

Flip Fabric open and Press Seam.

Continue adding assorted strips until batting is completely covered.
When batting is completely covered with strips, turn runner over to back side.
Trim strips down to backing size.

You table runner is already quilted so…
You are now ready to add binding and Enjoy. I often sew the scraps from the runner together to create my binding.
Sew Happy,
Karen
Finished Project
