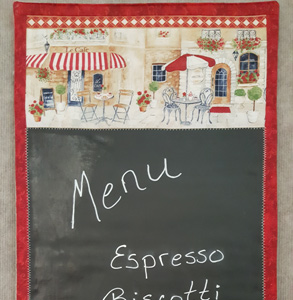
Chalk Board Wall-Hanging
Fabric Requirements
- Cut chalk board fabric 14 x 18
- Cut topper fabric 7 x 14
- Cut bottom fabric 3 ¾ x 14
- Cut outer side borders 1 ¼ x 28
- Cut top borders 1 ¼ x 15 ½
- Cutting batting measuring 15 ½ x 29 ½
- Cut 2 backing fabrics
- Cut lower backing fabric 24 ½ x 15 ¼
- Cut upper backing fabric 7 ¾ x 15 ¼
Chalk Board Wall-Hanging Instructions
Using ¼ inch seam, sew topper fabric to top side of chalkboard fabric.
Using ¼ inch seam, sew bottom fabric to bottom end of chalkboard fabric.

Using ¼ inch seam, sew side borders to chalkboard fabric.

Using a ¼ inch seam, sew top and bottom borders to your wall hanging.

Add desired decorative stitches, I used a blanket stitch around the edge of my chalk board fabric.
- A no binding backing
- Prepare backing fabric
- Measure completed top and cut two backing fabrics.
- Using width of top, cut 1 width of top x 8 inches.
- Using width of top, cut 1 width of top x 18 inches.
- *Choose number of desired button holes and size of button. Flat buttons will work best.
- Prepare top backing fabric by folding over 2 inches at bottom and inserting button holes.
- Fold over 2nd backing piece and press fold.
- Line up upper and lower backing and sew buttons to lower backing.
- Next layer batting and chalkboard top and backing.
- Place batting on table, layer chalkboard top next face up. Now place backing pieces, wrong side down on top.
- ** Make sure button holes overlap lower bottom backing piece.
- Sew ¼ inch seam around entire piece.
- Using opening on backing, flip inside out allowing the right side of backing and right side of chalkboard to show.
Sew Happy,
Karen
Finished Project
